Sunday, October 20, 2013

Cosplay Class-20131018

Let me start this with a question, “What do you see first when you’re looking at someone?” I guess the answer is EYES for most people, not include some male(= ̄ω ̄=). That’s why in Cosplay makeups, eye makeups are the most important. 
The characters from comics and animations have a common feature – big eyes. Their eyes are much bigger than us in the real world. Let’s do a quick tutorial first.


Starting with a clean eye and wear your contacts. Normally I don’t suggest contacts bigger than Φ14mm because they might hurt your eyes. And then use concealer to lightly cover the brows. The fictional characters always have thin and beautiful brows. 
Remember using powder to set the tone after concealer layer. Now choose a color brow pencil – the color will depend on your character – to draw the brows. Please do not follow where your natural brow goes. Now it’s time to “reproduce” your eyes. Using eye shadow primer before everything starts. In case your face don’t look like a flat board, use some colors that we called them “the ground tone” – because they are brown colors that are two or three tone darker than your face, and look like the ground. 
You need to shade the nose bridge and darken the crease with ground tone color. This will create a deep sunken eyelid, which looks like the western people. That will make your face deeper. Please keep the eyeshadow in the shape of flat straight. 
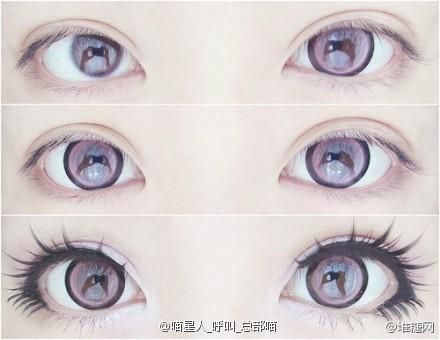
Tapping on any bright color on the lids will emphasize your eyes. Now it’s time to line your eyes. You should slightly create a wing liner. Also line the bottom waterline half-way. If you want to make your eyes look bigger, you might use a white or skin tone pencil. If you want your eyes look strong and powerful, try a black liner pencil. The second last step is put on false lashes. Sometimes the false lashes will stretch your eyes and make you look great. 
Finally, depends on your character, use different colors of eye shadow to lightly dust along your bottom eyelid. 


That’s all for what I always do eye makeup for cosplay. I know you will always have a better idea. If you have seen other great tutorial, please feel free to write them done or paste the links below. I will be really appreciate.

Saturday, October 19, 2013

Cosplay Class-20131011

Today I will show you some lighting skills. A good light setting can upgrade your photos, specifically when you are doing Cosplay photography. You can provide extra lighting, mount your camera on a tripod and use a longer exposure, or paint with light (leave the shutter of a tripod-mounted camera open in a time exposure while you illuminate the subject with repeated electronic flash bursts, a flashlight, or some other light source). 


Let’s see some examples. Most of the example photos were taken at night. There’s no natural light anymore, you have to use extra lights to build the scene. 


=======================================================================


In this photo, the photographer set a flash light that oppose to the model. If the light is straightly to the model’s face, there will be no shadow on his face. In case to make the light softer, the photographer put a silver umbrella reflector in front of the light. Also there are some traffic lights and street lights to brighten the background. 


=======================================================================


This photo was taken at dusk. The higher background (the sky) is still bright but the lower background (the city) is dark. The photographer set a light with diffuser in the left front of the model. The broader the light source, the softer the light. The narrower the source, the harder the light. A broad light source lessens shadows, reduces contrast, and suppresses texture. A narrow light source does the opposite. This is because, with a broad source, light rays hit your subject from more directions, which tends to fill in shadows and give more even illumination to the scene. 


=======================================================================


This beautiful bride’s photo only used a small light. But she still looked soft and bright. Like the first example, the photographer uses a oppose flash light and a silver reflective umbrella. That’s because the closer the light source, the softer the light; the farther the source, the harder the light. This stands to reason: Move a light closer, and you make it bigger—that is, broader—in relation to your model. Move it farther away, and you make it relatively smaller and therefore narrower.


So, today I’ve shown you three ways to set your lights when taking photos in a dark place. Next time, I’ll give you some examples in a brighter scene! See you(●′ω`●)!

Sunday, October 6, 2013

Cosplay Event-20130929


Today we have this amazing event in Japan town. It’s J-pop (Japanese popular culture) and Anime Fair 2013! There are many cosplayers. Later in the afternoon, there will be a competition. The organizer invites three professional judges. They will choose the best cosplayer today!

Let’s go to wonderland!


Creative Commons License
Alfacosplay by http://alfacosplay.blogspot.com is licensed under a Creative Commons Attribution-NonCommercial-ShareAlike 4.0 International License.